How to re-target Solo Ads Leads with Facebook Ads
We Spoke last week on how to re-target your solo ads leads int Google Ads, Today we are doing the same in Facebook Ads.
First, The basics of Facebook Ads
For those that are not yet familiar with how Facebook Ads or other similar digital advertising platforms work, let’s start by explaining the basics. There are generally two terms that these platforms operate with. The first one is pay-per-click (PPC), which means that businesses are only going to pay when a user clicks on its ad. The second one, pay-per-impressions (PPM), where businesses are trying to gain exposure and awareness and are, therefore, paying for each thousand impressions their ads garner.
There are, of course, other ways of paying for an advertising campaign, depending on its goals, with options such as pay-per-acquisition (PPA), where you pay for each conversion, pay-per-view (PPV), a strategy aimed at video campaigns. Facebook Ads uses the data it has collected on users to determine the best targeting options for advertising campaigns. Additionally, you can also target users based on their demographic data, interests, behaviour or the apps or websites they use. After the campaign is deployed, with the help of Facebook Pixel, a tracking code placed on landing pages or websites, Facebook can track engagement and conversions to help you achieve your goals.
Now Let’s Get To it : Login to Facebook Ads Manager
Here are the steps you need to follow to make sure that you are properly uploading an email list to Facebook Ads:

Go to Audiences
From the hamburger menu next to the Facebook logo, select the Audience section
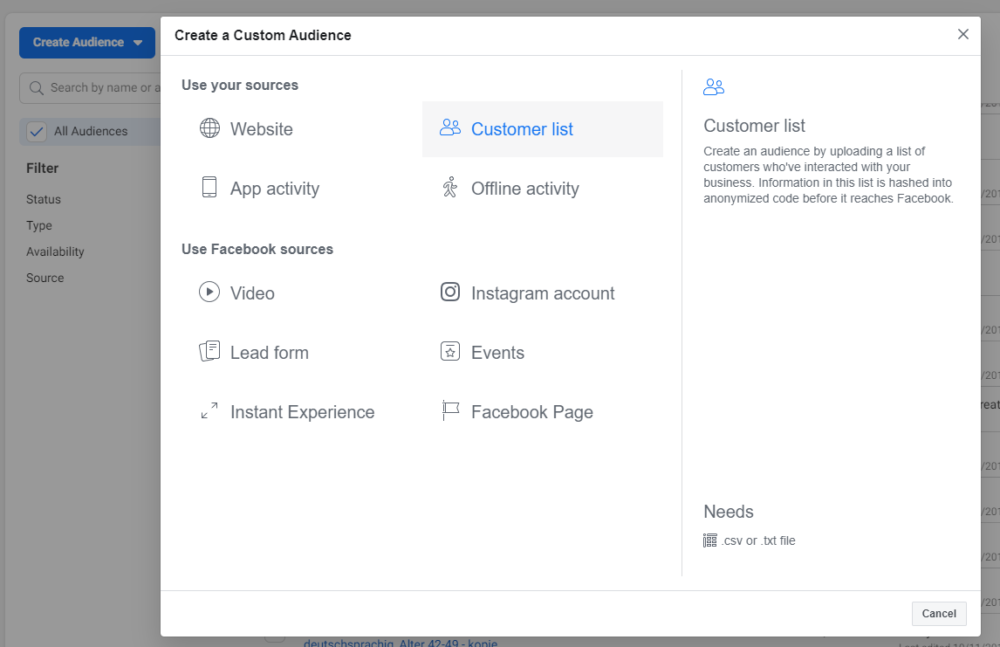
Create a Custom Audience
Click on the drop-down menu called Create Audience and select the Custom Audience option
Select the Customer list option
Format your list
You can use the template that Facebook Ads offers or read the formatting guidelines before starting to format your list. Keep in mind that you should have already created the relevant segment from your email service provider. Optionally, you can use your entire email database to re-target on Facebook Ads.
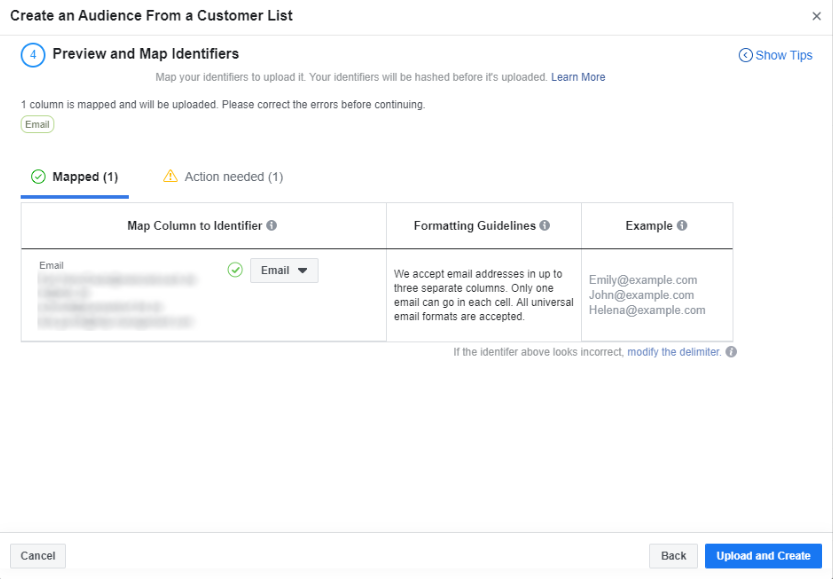
Upload your email list
Map all the relevant field in your CSV file
Complete the upload process
Once the list is uploaded to Facebook Ads, it will be processed and afterwards, if everything goes according to plan, you will be able to use it in your advertising campaign, Next …

Set up a Facebook Ads campaign using an email list
Considering that by now your email list is uploaded, you can start setting up your first campaign using this list. To create a campaign to re-target email subscribers on Facebook Ads, you need to follow these steps:
Select the objective
Depending on what you want to achieve with this particular campaign, you will be able to select the corresponding objective
Name the campaign
Select your targeting options
Use the targeting options described above to create your audience
Decide on placements
Facebook Ads offers various placements for ads, starting with their own platforms (Facebook, Instagram) but also a network of apps and websites (Audience Network)
Set up a budget and schedule
Create the ads
Depending on where you want your ads to run, you will need to associate a Facebook or Instagram account to your ads. Afterwards, decide on the type of ads you want to use and create the headlines and descriptions
Enable conversion tracking
Using Facebook Pixel, you will be able to track conversions, such as sales, lead generation or form submission directly in the Facebook Ads Manager interface. If you haven’t yet installed Pixel on your website, follow these guidelines for how to create and implement one on your website
Review your settings
It is always recommended that you review all settings before deploying a new campaign. Even the most experienced digital marketers or PPC specialists might make mistakes from time to time, that’s why it is best to check that everything looks good before proceeding
Start your new campaign
If you have followed every step, you are ready to launch your campaign. Good Luck

